Getting the Renesas Synergy platform toolchain up and running
The following paragraphs will outline all the steps necessary and you will find that the installation of both tools is free of any hassle as the installers will take care of everything needed, once you made your selections on what and where to install. Once the installation is done we will perform a short sanity check to ensure that the installation is working.
Just in case you prefer to work with the IAR Embedded Workbench for Renesas Synergy (IAR EW for Synergy) you will find an adapted version of this chapter on the Web.
Introduction to the Synergy Gallery
First step of the installation process is to go to the Synergy Gallery on the web at https://synergygallery.renesas.com, which is the convenient single point of access to everything needed for the development of a Synergy application: Development environments, compilers, tools, documentation and support. The complete ecosystem is there at your fingertips. And not only from Renesas, but also from Express Logic, IAR Systems or from the creators of Verified or Qualified Software Add-Ons (QSAs).
To get access it is necessary to register as a user. Registration is straightforward with only a few questions to be answered before access to the site is granted. During the registration process you will also have the opportunity to register your company or organization. This will give you additional benefits as the Company Super User will become available to you, allowing you for example to create any number of software licenses for development and / or production. Note that the first user registering a company becomes the Super User. If your company is already registered, ask your Company Super User to add you to the user database and you are already settled. If you are not sure which registration to use, no worries, as the company registration can be done later on as well. No matter if you register as individual or as company, you will always have full access to the site.
Once registered, a simple log-in will be enough to browse the site and to download any software package immediately. And, everything is accessible from the start-page, so no switching back and forth between different pages is necessary. And just in case, you will need some help or you have a question the web site doesn’t answer, there are plenty of options to contact Renesas for help.
The easiest way to get almost instant support is using the Live Chat feature on the support page. Synergy specialists from Renesas will provide level one support online, 24 hours per day, 5 days a week. And this is especially great, as you will not talk to a call-center somewhere on this planet, but to a real expert on the Synergy Platform, knowing it by heart. Other possibilities are to search the Knowledge Base, or to post more complex questions to the Renesas Rulz forum, discussing it with other Synergy developers. On the support page, you can also access documentation, the Synergy Xplorer or browse the Synergy Wiki.
Downloading and Installing e2 studio and the Synergy Software Package
The e2 studio contains all the tools necessary to create, compile and debug projects for the Synergy Platform. It is called ISDE, as additional solution-oriented components and plug-ins have been added, making it more powerful. This is especially true for the configurators, which allow an easy graphical access to the different hardware features like the interrupt control unit (ICU) or the clock module without the need for deep study of the user’s guide. These configurators will create all the necessary settings and the initialization code automatically and they include an error-checking feature to detect problematic settings already at design time, saving tons of hours otherwise spent for writing and / or debugging code not adding value to the application itself. At least, I for myself would have been more than happy, if such tool had been available when I first started writing software for embedded processors. It’s so much easier with the Synergy Platform!
The next paragraphs will walk you through the different steps of downloading and installing e2 studio and the SSP on your Windows workstation.
Download of e2 studio and the SSP
The first step to perform is to download the two installers for the e2 studio and the SSP from the Synergy Gallery:
On the Synergy Gallery home page, first select Development Tools and e2 studio ISDE from the menu. The e2 studio homepage shows up and clicking the blue Download button at the lower right hand side of the picture will get you straight to the Download Details page. Once there, refrain from starting the download immediately. First check the minimum PC systems requirements to make sure that the tool will work on your machine, then start the download by clicking on the blue Download-button on the right hand side of the Latest Version header. Read and accept the license agreement appearing and the download of the zipped installer will start. While the e2 studio installer is downloading, take some time to review the installation instructions found under the Documentation tab. They are helpful later on when installing the ISDE.
Downloading the SSP follows the same basic steps: On any page of the Synergy Gallery select SSP at the top which will get you to the homepage of the SSP. Again, select the Download button which will get you to the associated Download Details page. Check again the minimum PC systems requirements, to be sure they match your system. Once more, the blue download button at the right of the Latest Version header will start the download process. As with the e2 studio download, take some time to review the installation instructions found under the Documentation tab and to download the Release Notes and the User’s Manual for the SSP.
Installing the tools
Once both downloads are completed, the installation process can start. There should be two files in the download-folder by now: One is called setup_e2_studio_5_3_0_023.zip (the revision number may vary) containing the installer for the e2 studio and the other one is called SSP_Distribution_1.2.0.zip (again the revision number may vary) containing the installer for the SSP.
The installation-sequence is important: The e2 studio ISDE needs to be installed first to allow correct integration of the SSP later on. To start the ISDE-installation, the downloaded archive needs to be decompressed first. This will create a file named setup_e2_studio_5_3_0_023.exe. Double-click on it to start the setup. If you are running Windows 10, and depending on the security settings of your workstation, installation might stop with a warning from the operating system that “Windows protected your PC”. In this case, click on “More info” and on “Run anyway”, and it will proceed. Windows 7 and 8 may produce a similar warning, just click Yes and the installation will proceed.
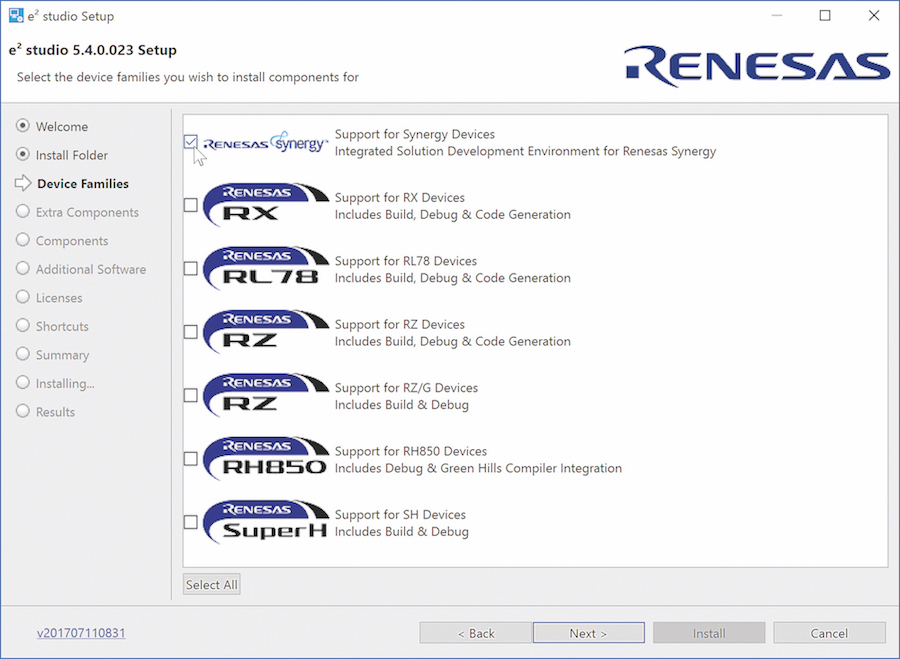
Follow the dialogs of the installer. If your workstation is behind a proxy, you may want to configure it at the Welcome-screen (lower right link) to ensure that the installation will work as expected. On the next screen the installation path needs to be provided. Use the default or change it to suit your needs, but remember your selection. Later on you will need to install the SSP into the same folder. On the next screen, the device families can be chosen. Make sure to select Renesas Synergy.
Click on Next and you will be presented with a couple of choices for extra components to be installed. Make your choice. While most options are not particularly useful for Renesas Synergy, you might want to install the support for SVN and GIT. If you do not know yet, don’t worry: You can re-run the installer any time later to add or remove features without having to go through the complete installation process again.

On the following components screen (see Figure 3), having everything selected is the way to go. Especially take care not to deselect the Renesas Synergy RZ Debug Support. If you do so, you will not be able to create a debug configuration and to connect to a target board.

The next screen will allow you to select additional software and the compiler (see Figure 4). Check the box beside GCC ARM Embedded 4.9 2015q3 (or later revision) to install the code generation tools. Follow the directions on the next screens, accept the terms of the Software Agreements and the setup will start. Be patient, it will take some minutes. Allow the installation of the device drivers from Renesas once prompted.
Later in the process, the installation of the GCC toolchain will start automatically. Follow the directions of the installer and wait for the installation to complete. When asked for the installation path it is highly recommended to leave it at the default, or to write down the exact location. The automatic toolchain integration will only work if it was installed at the default location. If you altered the path, you have to manually integrate it later on.

There will be a last screen, asking for some final steps. Check Add path to environment variable, as shown in Figure 5. This will add the path of the toolchain to the Windows environment and is necessary to insure an easy registration of the toolchain with e2 studio. At this point there is no need to run gccvar.bat, so you can uncheck this box. Click on Finish and later also close the installer of the e2 studio, once finished.

The next step is to install the SSP. For that, locate the downloaded zip-file SSP Distribution_1.2.0.zip and extract and run SSP_Distribution_1.2.0.exe. Follow the directions of the installer until you reach the Choose Components screen. Make sure that the SSP Release Pack and the SSP Documentation are selected. On the next screen check the path to confirm that you install the SPP in the root folder of the previously made e2 studio installation. The ISDE was installed to C:\Renesas\e2_studio by default. If you changed that during the setup of the e2 studio, you have to enter the correct path here. Click on Install and the installation will start. During the process, you will be asked where to install the documentation. Accept the default, which points to C:\Renesas\Synergy or enter your own path. This will install the following documents: The HL-version of the SSP User’s Manual, a readme-file detailing last-minute updates and a PDF-file with SSP developer examples.
Once this installation has finished it is time to start the ISDE for the first time.
2.3 Starting for the first time
Start the e2 studio from the Start Menu of the PC. It will ask you for a location for the workspace. You can accept the default or choose your own. As this is the first time you start the ISDE, it will extract and refresh additional support files and will restart itself afterwards. During the startup process, you should see a small window called Toolchain Integration, as long as you installed the GCC toolchain at the default location. Make sure to select the version of the GCC ARM Embedded toolchain you installed before and click on Register. Failing to do so will prohibit compilation of your projects later on and you will have to manually register the tools from inside the ISDE.

Once you are at the Welcome screen dismiss is by clicking “Workbench”. Next step is to create a first simple project to ensure that everything is working. For that, go to File à New à Synergy C Project on the menu bar, which will bring up the project configurator. Enter a name for this project, for example “MySynergyProject” and select the GCC ARM Embedded toolchain at the right hand side. The next step is to point the e2 studio to a valid license file. During the installation of the SSP an evaluation license was placed in the following folder <e2 studio installation path>\internal\projectgen\arm\Licenses. If you had chosen to accept the default path during installation, this path will be C:\Renesas\e2_studio\internal\projectgen\arm\ Licenses and the file selector will get you straight to this location. Select the (only) file there, with the name SSP_License_ Example_EvalLicense_20160205.xml (or similar). Once loaded it will show the license information, the supported components and the related permissions in the window below.
The evaluation license you just installed allows you to use all parts of the Synergy Tools. The only limitation is that viewing or editing the source code for ThreadX, X-Ware components, libraries, stacks, and Application Frameworks API code will be limited. If you want to view or edit this code, you will need a development and production license, which can be requested from the Synergy Gallery.
Click on Next to get to the device and tools selection screen. Select a board. As we only want to test the development environment, simply select the S7G2 SK for this first test and set the corresponding device R7FS7G27H3A01CFC will be listed automatically not already listed. Have a look at the toolchain. It should read GCC ARM Embedded with the version 4.9.3.20150529 or later. If you installed the GNU-tools but they are not listed here, you need to integrate them manually. To do this go to the Help-menu of e2 studio and select the entry Add Renesas Toolchains. Please note that the Scan option only works for toolchains having been installed at their default location. If you haven’t installed the GNU-tools at their default location, either enter the path to your custom folder in the entry field or browse to the location using the files browser.
Next step is to select a project template. A project template includes the correct device and board dependent Board Support Library (BSP) and, if chosen, ThreadX support enabled (no matter which template is chosen, ThreadX can be enabled in the Threads tab of the Synergy Configurator. In addition, some of the templates include complete example projects as well. For our test, it is sufficient just to use a basic package, so select Blinky. Click on Finish. The configurator will extract all necessary files and will ask you if you want to open the Synergy Configuration perspective. Answer Yes and the perspective for the Synergy Configuration will show. In the configurator, you could configure the SSP and most of the on-chip hardware of the processor. For the template we used for this example, everything has already been set, so click on the small green arrow saying Generate Project Content at the upper right-hand corner of the window and the configurator will create the configuration files and add them to the project.
Finally click on the small “Hammer”-symbol near the left hand corner of the toolbar on top of the ISDE and the project will compile and link. Once it has finished, it should show a status of 0 errors, 0 warnings after completion.
Now everything is set up and working and you are ready to start your own project. But hold on for a moment and ponder for a few seconds what we just did. I would think that for setting up this enormous software environment for a complete family of microcontrollers, the process is very easy and straightforward. Remember, we installed a software package with over 200 man-years of development effort and a complete ISDE in less than 10 minutes. I consider this as a very effortless process!
And, if something went unexpectedly wrong during the installation, you know help is always available and you can start to chat with a Renesas Synergy Platform expert even right out of e2 studio: Go to Help à Synergy Helpdesk and you will be directed to the Live-Chat on the Internet. Another possibility is to click on the Live Chat icon on the Summary tab of the Synergy Configuration perspective. This will open the chat window directly inside e2 studio.
2.4 Keeping Your Installation Up-To-Date
Having installed the tools, you might want to keep them in good shape, which means you want to keep them up-to-date. Or you are so excited about all the possibilities the Eclipse-based ISDE offers, that you want to install additional software. Keeping the installation current is achieved by loading the latest installations from the Synergy Gallery. Using the Check for Updates feature inside e2 studio is not recommended, as the updates there do not add anything useful for Synergy Platform.
If you want to install additional software, go to Help à Install New Software. On the following screen, choose the All Available Sites to search all sites and you will be presented a list of software available for download. And, of course, another way to get updates is to go to your favorite website, the Synergy Gallery, where you can find updates and additional software as well. For updates to the SSP, the Synergy Gallery is the best place.
Now that we know that the installation is working, the next steps will be to check out a development kit and to write your very own code.
- Installing the IAR Embedded Workbench for Renesas Synergy
Installation of the IAR Embedded Workbench for Renesas Synergy follows mainly the same steps. The complete chapter for this is available on-line on the books homepage as a PDF-file for your reference.
About the author: Richard Oed is technical writer.
 If you enjoyed this article, you will like the following ones: don't miss them by subscribing to :